SETTING UP A PICKET FENCE – PART 01
In this lesson we will go in-depth about setting up a fully procedural picket fence.
The focus of this exercise will be on creating a solid, procedural foundation to build this asset. The geometry for the fence and posts will be using simple geometry (effectively, basic boxes). Once the setup is complete, you can go back and change the designs to something more complex.
There will be a lot of nodes to go over. I will explain and elaborate the concepts on this page, while in the videos, I’ll run through the workflow.
Read this post carefully and pay attention to the content
Let’s begin…
 In our script, we will round that number, and then multiply it by 2. This will also ensure we’re dealing with even numbers at all times.
For example, let’s say that one curve coordinate is: (5.2,0,7.4)
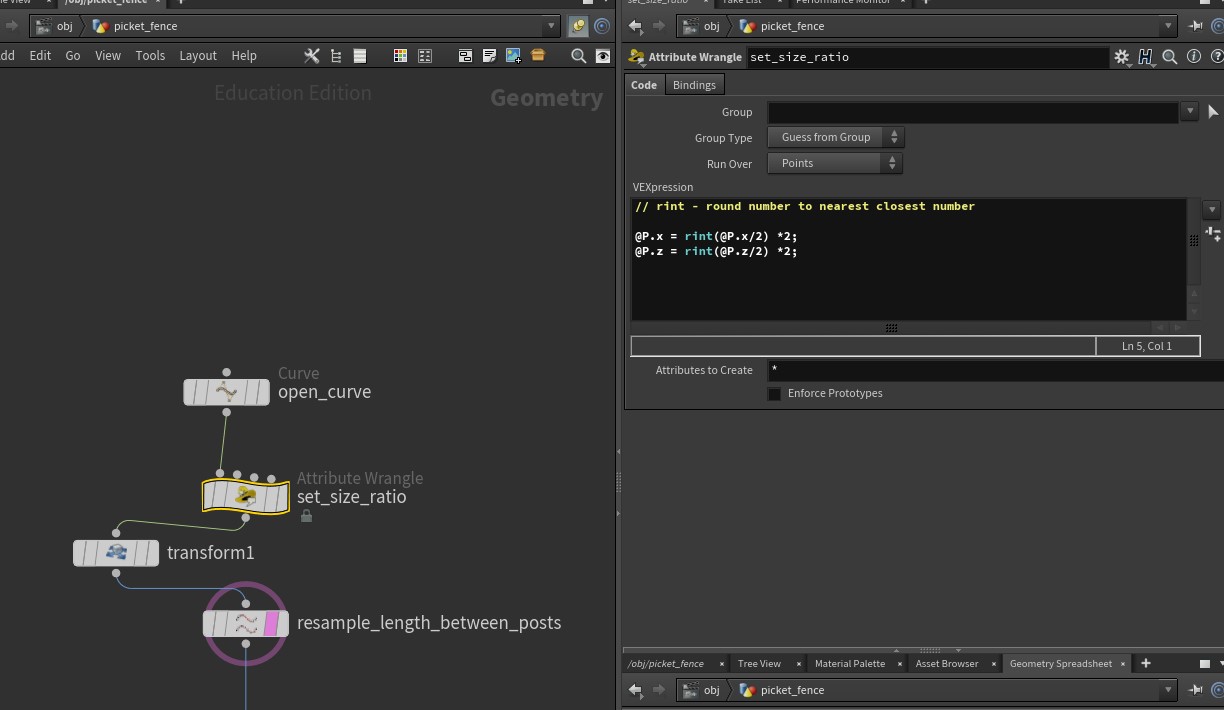
In the example, we typed the following code:
In our script, we will round that number, and then multiply it by 2. This will also ensure we’re dealing with even numbers at all times.
For example, let’s say that one curve coordinate is: (5.2,0,7.4)
In the example, we typed the following code:
@P.x = rint(@P.x/2)*2;
What this means is that we’ll grab the current point on the X-axis, divide it by 2, round it, and then multiply it by 2.
i.e. 5.2/2 = 2.6
Rounding it to the nearest value would be 3. We then multiply it by 2 and get 6.
@P.z = rint(@P.z/2)*2;
We’ll do the same with 7.2 on the Z-axis:
7.4/2 = 3.7
Rounding it is 4. Multiply by 2 and we get 8.
So the optimized coordinates would be (6,0,8).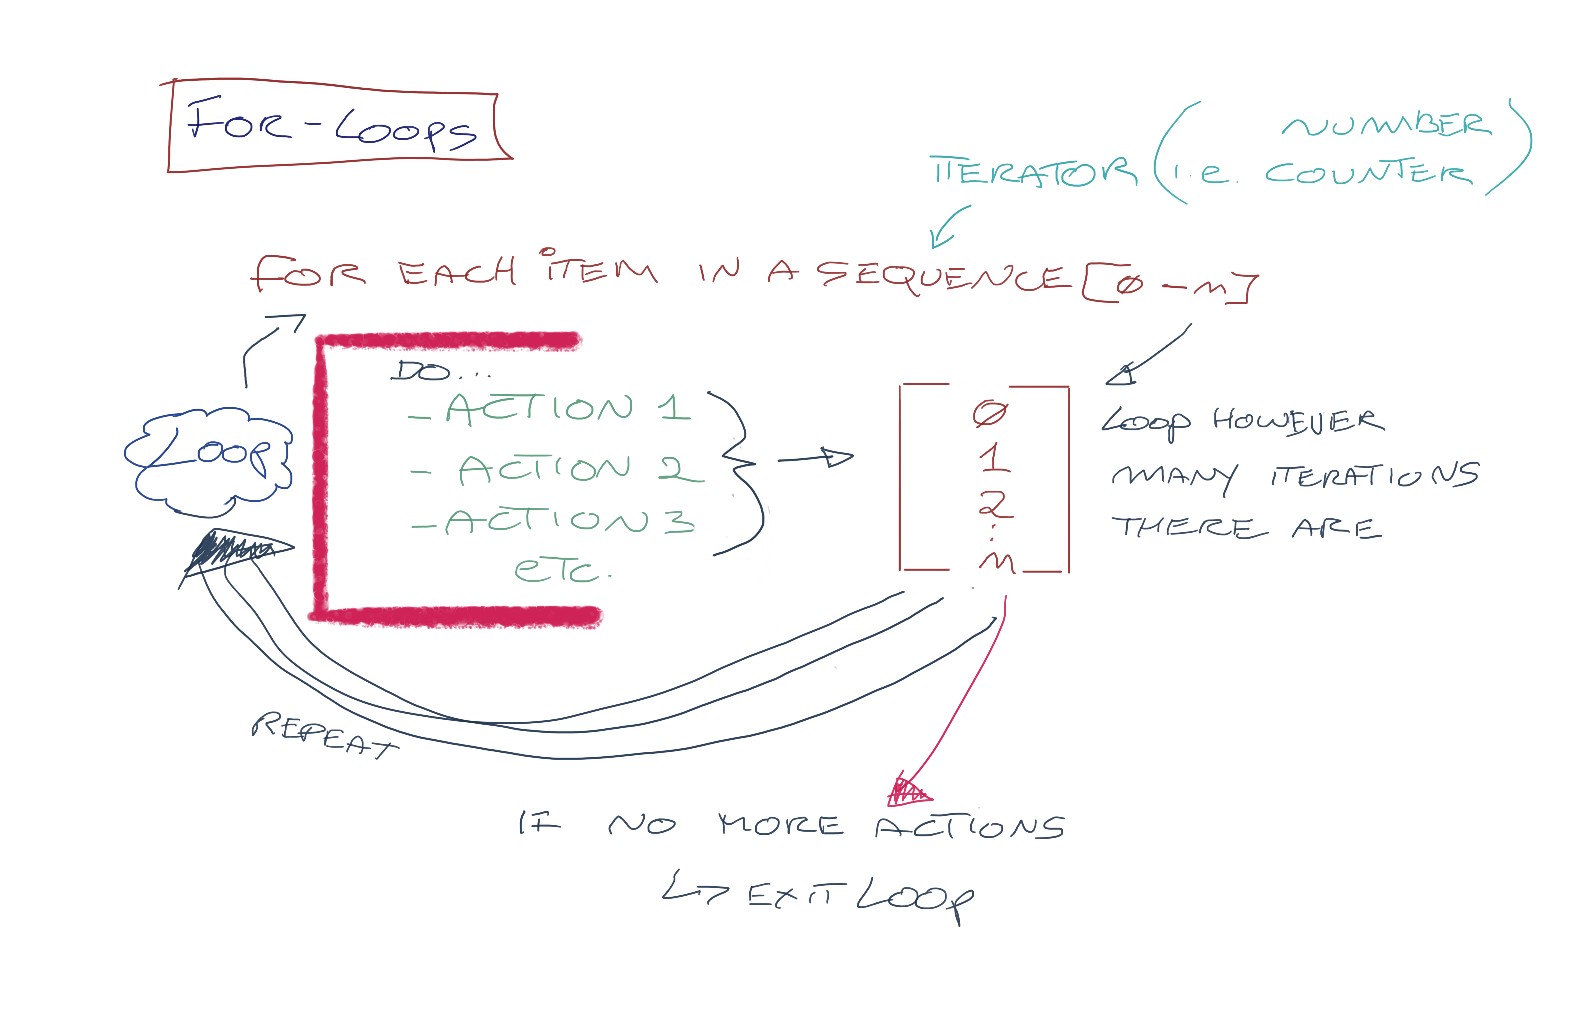 In our case, we are going to divide the curve into multiple segments and then iterate over each segment and resample it so we can place pickets on it.
The length of each segment will also decide on the number of pickets placed, so we are going to assign a calculator that will figure out the proper segment length, divide it by the width of each of the pickets, and provide the ideal number. Also, in order to give us a bit more control, we are going to create a slider that will provide us with the ability to increase or decrease that number so we can art direct the look of the fence to our requirements.
Below you’ll find the code for the nodes mentioned in the Part 03 of the video tutorial. This assumes you’ve named your nodes exactly like I did mine in the demo.
Attribute Wrangle (picket_spacer)
In our case, we are going to divide the curve into multiple segments and then iterate over each segment and resample it so we can place pickets on it.
The length of each segment will also decide on the number of pickets placed, so we are going to assign a calculator that will figure out the proper segment length, divide it by the width of each of the pickets, and provide the ideal number. Also, in order to give us a bit more control, we are going to create a slider that will provide us with the ability to increase or decrease that number so we can art direct the look of the fence to our requirements.
Below you’ll find the code for the nodes mentioned in the Part 03 of the video tutorial. This assumes you’ve named your nodes exactly like I did mine in the demo.
Attribute Wrangle (picket_spacer)
f@postLength = `arclen("../carve_fence",0,0,1)`;
float spacer = chf(“spacer”);
f@postLength *= spacer;
Explanation: We start by creating an attribute called postLength, which uses the command arclen to measure the length of each segment. It’s getting that information from the carve_fence node. As the loop repeats, it will continuously update that length depending on with segment the loop is currently iterating upon.
A local float variable called spacer is created. Using the command chf(“name”); and clicking on the Create Spare Parameter button, we create a slider whose values will be connected to the spacer variable.
Finally, we multiply the attribute postLength by the spacer variable to receive the ratio of points to generate within the segment. This information then is going to be passed onto the resample node below.
NOTE: varA *= varB is the same as writing: varA = varA * varB. This goes for +=, -= and /=
A great explanation of what Attributes and Variables in Houdini can be found in this link: https://houdinitricks.com/vex-attributes-vs-variables/
Read it. I will quiz you on it.
For example, if the length of the segment is 5 units, and we set the spacer variable to 0.255, we get 5 x 0.25 = 1.25
This value then is divided by the width of the picket in the resample node and returned as an integer.
prim("../picket_spacer/",0,"postLength",0)/bbox("../picket/",D_ZSIZE)
Explanation: The expression in the resample node makes queries the attribute postLength found in the picket_spacer node and returns it as the value for the current primitive using the prim command.
It then divides that number by the ZSIZE of the picket geometry using the bbox command.
This number is then rounded as an integer and used as the number of segments to split our curve pieces.CONNECTING THE PICKETS AND THE POSTS – PART 04
In this section, we exit the first For-Loop and set the normals on each point along the segments we created earlier to follow the orientation of the curve.
We use the polyframe node one more time, like we did above, with the posts. Here is the link to the documentation for polyframe.
The main thing to remember is:
- To setup the normals along the edge of the curve. This is done by using the First Edge option (see documentation)
- Assign the normals (N) to follow the horizontal tangent (tangentu). N is a built-in attribute used by Houdini. You will be using it over and again to have granular control over how your meshes and points behave.
The next part adds a second For-Loop. This time, it is to copy the pickets on all the points we created in the above section.
Finally, we merge the pickets with the posts that we positioned in the beginning, and voila – a dynamic, procedural picket fence.
WEEK 5 COURSEWORK
Go over the picket fence videos. There is a lot to cover, so approach this methodically.
Use the documentation, and Google is your friend in this case. Two very useful sites are forums.odforce.net and www.sidefx.com/learn/getting_started/
I’ll be available to answer any questions on Teams, Discord or email.